SAP NAVIGATION
- Here in this manual i had taken example of particular company and according to that explanation has been given.
 |
| SAP HOME SCREEN |
 |
| Typical icons |
 |
| SAP visualization option |
- Command field commands:
• /nxxxx : Calls transaction xxxx in current session
• /oxxxx : Calls transaction xxxx in new session
• /o : Overview of sessions for your user
• /n : Ends current transaction without
warning
• /i : Ends current session
• /nend : Logs off from system
• /nex : Logs off from system without warning
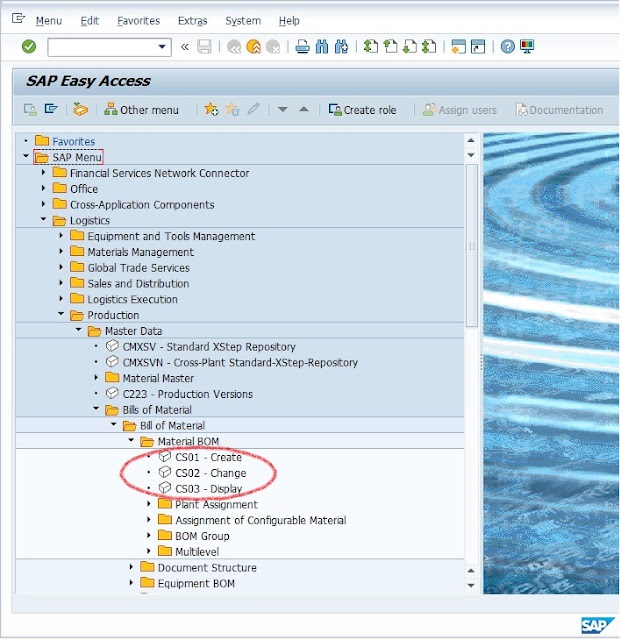
BILL OF MATERIAL (BOM)
SAP MENU
|
Logistics→ Production→ Master Data→ Bills of Material→ Bill of
Material→ Material BOM→ Create
|
Transaction Code
|
CS01
|
SAP MENU
|
Logistics→ Production→ Master Data→ Bills of Material→ Bill of
Material→ Material BOM→ Change
|
Transaction Code
|
CS02
|
SAP MENU
|
Logistics→ Production→ Master Data→ Bills of Material→ Bill of
Material→ Material BOM→ Display
|
Transaction Code
|
CS03
|
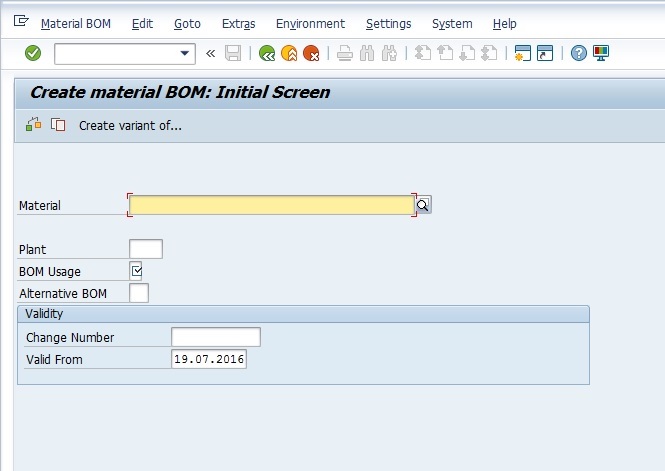
BOM is a master data which contains
what proportions of input materials are required to produce a std. quantity of
output.
- Choose the Material and Plant from the dropdown list.(Shortcut for the search option is F4)
- Choose BOM Usage 1 from the dropdown. (Usage 1 is Production).
- System will take Alternative BOM automatically as 1 if BOM is not created for that material. But if it is already created than it will take 2 and so on.
- After that press ENTER.
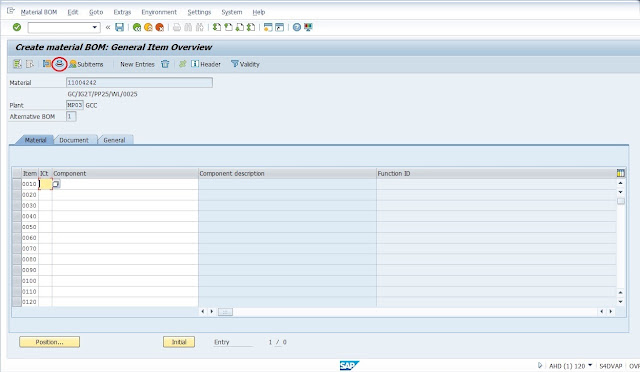
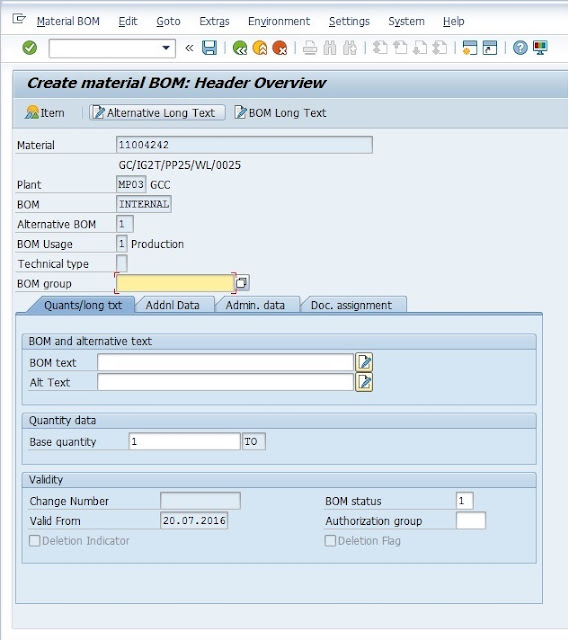
Press the Cap button at the top. It symbolizes Header data.
- Here, enter, the Base quantity of the Header material as 1. Base quantity is used as a base for requirements calculation.
After adding the base quantity select item button, it will show below window.
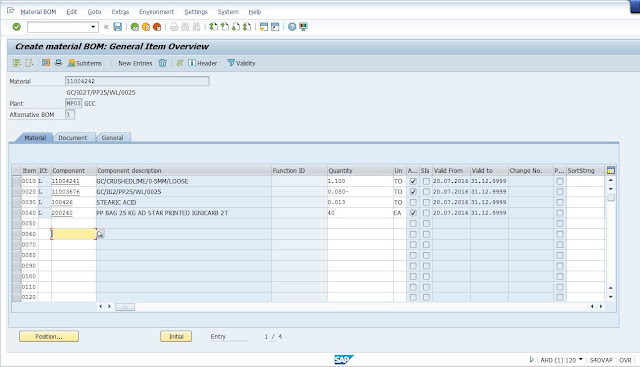
Here in the item screen:
- Enter the required input materials under the column field Component.
- Choose L from the drop down for all materials.
- L means Stock items, where you can stock these materials and otherwise it is N, which is Non-Stock item.
- Enter the required quantities of them under column field Quantity.
After adding the component and quantity press save button for saving the
BOM and hence the BOM is created for the particular FG.
- /n is used for exiting the current window.
- /o is used for opening the new window without exiting the current window.
WORK CENTER
SAP MENU
|
Logistics→ Production→ Master Data→ Work centers→ Work center→ Create
|
Transaction Code
|
CR01
|
SAP MENU
|
Logistics→ Production→ Master Data→ Work centers→ Work center→ Change
|
Transaction Code
|
CR02
|
SAP MENU
|
Logistics→ Production→ Master Data→ Work centers→ Work center→
Display
|
Transaction Code
|
CR03
|
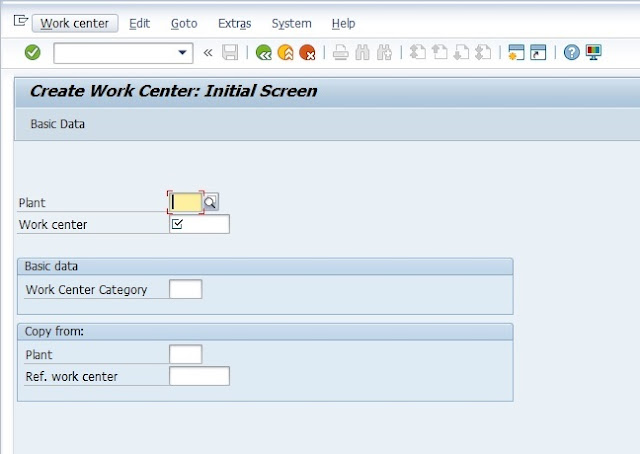
- Choose the Plant where the work center will be located; Enter the Work Center name.
- Choose the appropriate Work center cat. From the drop down. In this case, it is 0001.Press the ENTER button.
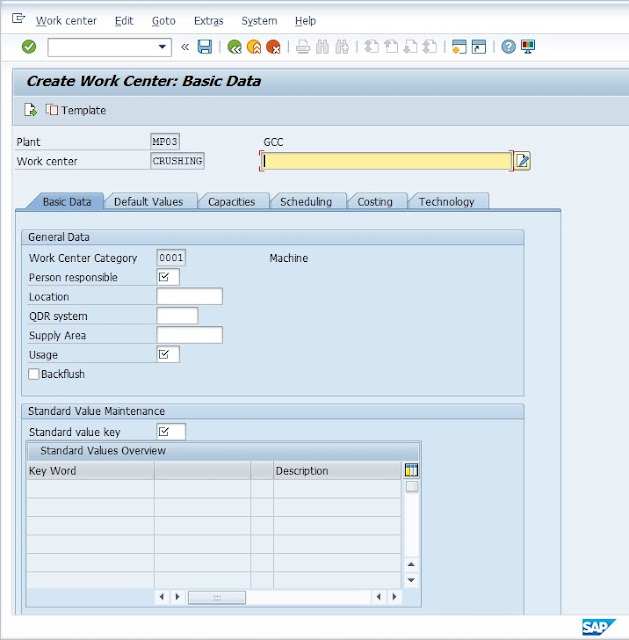
- Enter the description of work center in the highlighted area. Select SFI (Shift incharge) in Person responsible from the drop down list.
- For Usage field, choose 009 from the drop down list. Here, we are instructing the system to allow all kinds of task list types for this work center.
- Check the Backflush box.
- For Standard value key, choose ZSV1 for Ashapura Production from the drop down menu. You will the standard values overview.
- Now go to Default values tab.
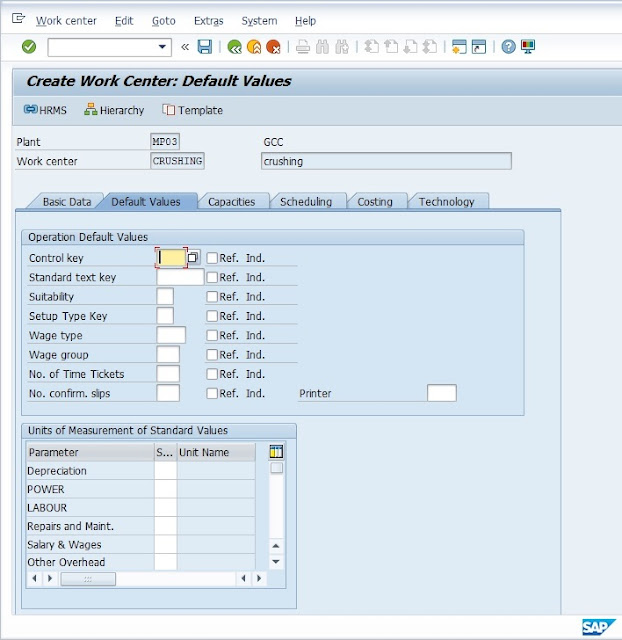
- Enter Control Key ZPP6 (Confirmation with Auto GR)
- For Depreciation, enter TO in the Std. Value unit field from list.
- For Power, enter TO in the Std. Value unit field from list.
- For Labour, enter KWH in the Std. Value unit field from list.
- For Repairs & Maint., enter TO in the Std. Value unit field from list.
- For Salary & Wages, enter TO in the Std. Value unit field from list.
- For Other Overhead, enter TO in the Std. Value unit field from list.
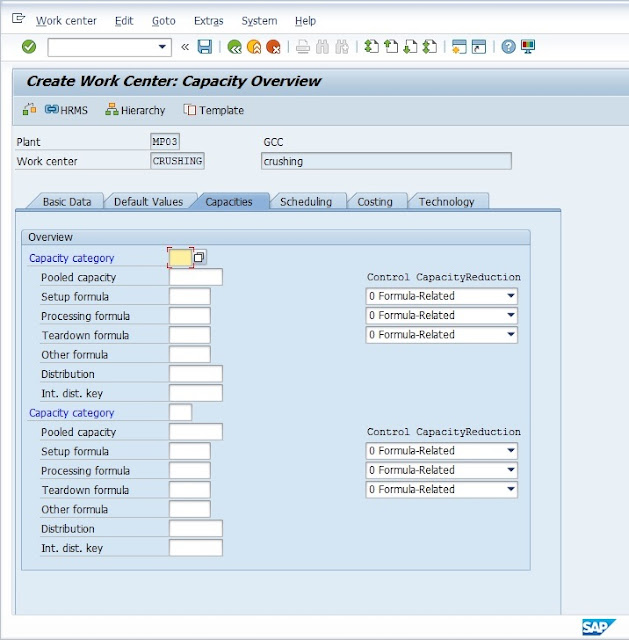
- Press Capacities tab.
- Enter prime Capacity category as 001(Machine).
- Press ENTER. A new tab will open as Create work center capacity: Header
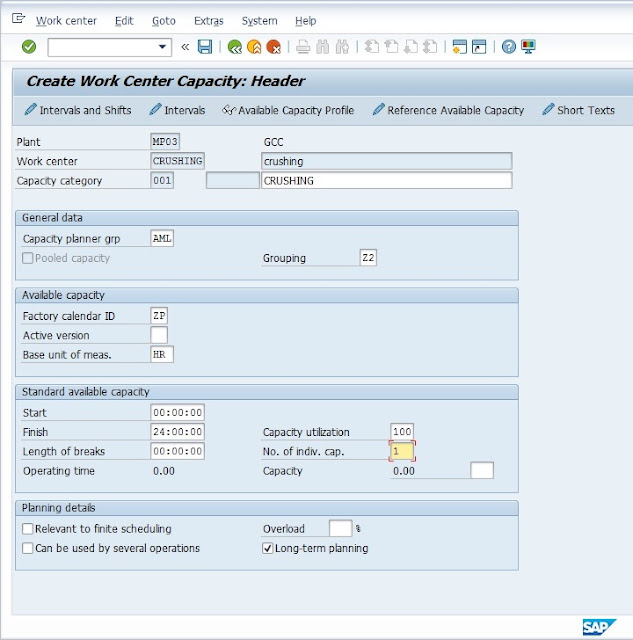
- Enter the description of work center.
- For Capacity Planner grp, select AML from drop down list.
- For Grouping, select Z2 for AML from list.
- For Factory calendar ID, select ZP from the list.
- For Base unit of meas., select HR from the list.
- Add Finish as 24:00:00
- Capacity Utilization as 100.
- No. of indv. Cap. As 1.
- Then press ENTER.
- Now click on Costing Tab.

- Select the Cost Center for that particular work center from the drop down list.
- Now in Activities Overview select the Activity Type of that particular activity. For example activity type of Depreciation is DEPT.
- Select the Activity Unit. Example for Depreciation it is TO.
- Select the Formula. Example for Depreciation it is ZAP001 from the drop down list.
- Repeat for Power, Labour, Repair and Maint. , Salary & Wages and Other Overhead with their respective Activity type, Unit and Formula.
- After that save the work center by clicking on SAVE button and hence the work center has been created.
ROUTINGS
|
SAP MENU
|
Logistics→ Production→ Master Data→ Routings→ Routings→ Standard
routings→ Create
|
|
Transaction Code
|
CA01
|
|
SAP MENU
|
Logistics→ Production→ Master Data→ Routings→ Routings→ Standard
routings→ Change
|
|
Transaction Code
|
CA02
|
|
SAP MENU
|
Logistics→ Production→ Master Data→ Routings→ Routings→ Standard
routings→ Display
|
|
Transaction Code
|
CA03
|
Routing is a task list where work
instructions regarding how material wise production conversion takes place in
the designated work center are stored.
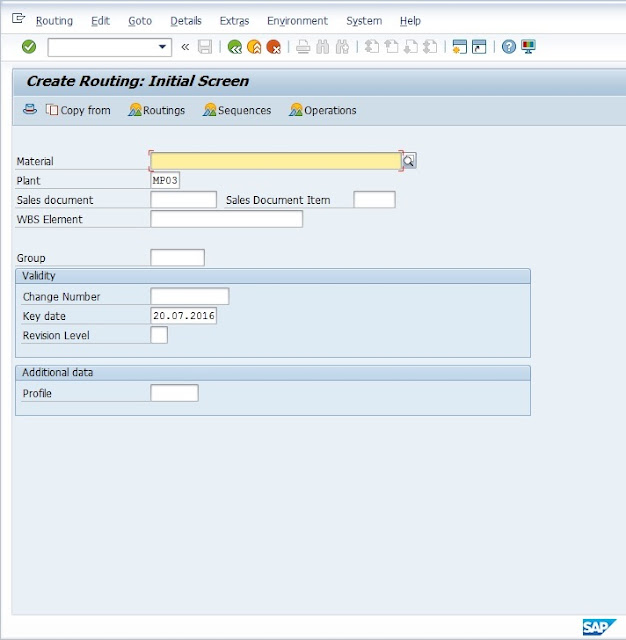
- Enter the Material & Plant and Press ENTER
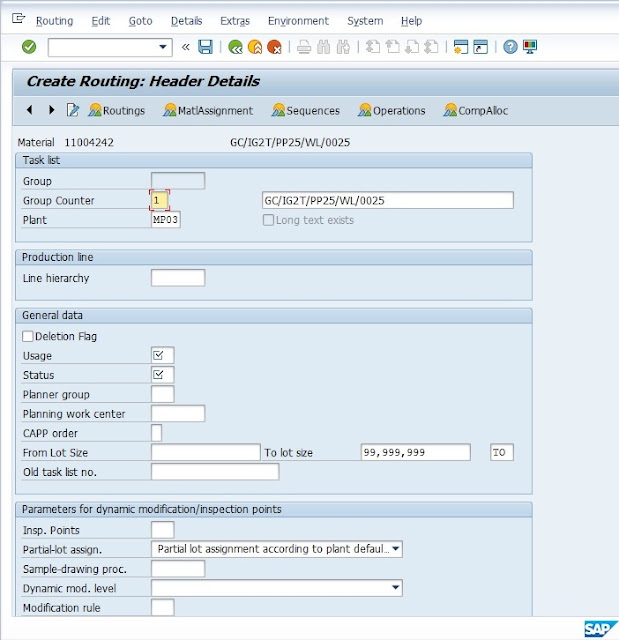
- For Usage in General Data, Select 1 (Production).
- For Status in General Data, Select 4 (Released (General)).
- Press ENTER.
- Select OPERATION button option.
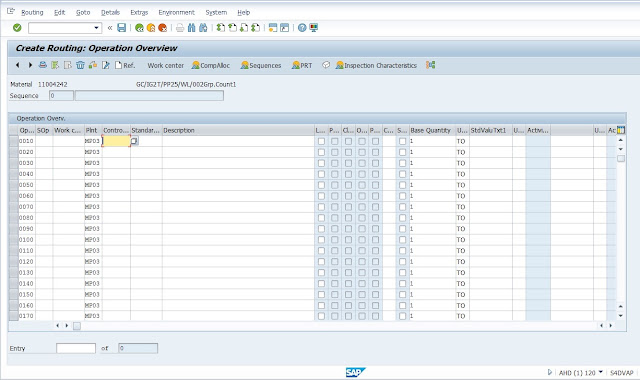
- You will see, Operation step nos. 0010 and so on. Against each step, choose the appropriate Work Center, where that operation takes place. And press ENTER. It will display the control key and all activities which we had added in work center.
- In Control key column, you will ZPP which we had selected in making work center.
- Enter the individual Operation steps in the Description column. Example Crushing of Raw material.
- Enter 1 as Base quantity (Base quantity is the std. output quantity.)
- Enter the values for all the costing activities for each operation. Example for power 30 KWH.
- Than press SAVE button will save the Routing u had made. While saving the Routing the Group No. will be created and will show at bottom left corner.
PRODUCTION VERSION
|
SAP MENU
|
Logistics→ Production→ Master Data→ Production version
|
|
Transaction Code
|
C223
|
A production version determines which
alternative BOM is used together with which master recipe to produce a material
or create a master plan for a material.
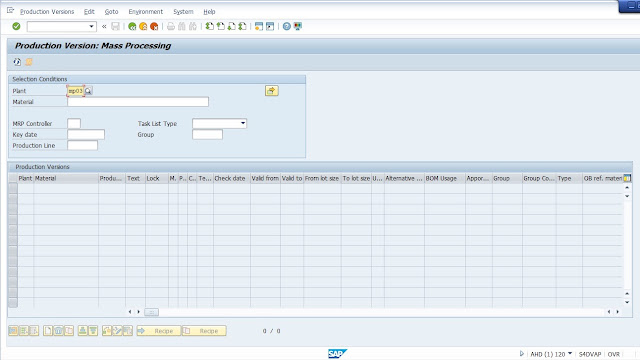
- Enter the Plant. Than Press ENTER.
- In Production version table. For Material, select the material for which you want to make production version.
- For Production version, type short name which you want to give. Example PV1
- In Text, type the description for that particular production version.
- Give date valid from to valid to.(Valid from date should not be before date of making bom)
- Select the Alternative BOM and BOM usage from the drop down list.
- Select the Group from the drop down list.
- For Type, Select N Routing.
- Now click on SAVE button to save the production version.
PIR (PLANNED INDEPENDENT REQUIREMENTS)
|
SAP MENU
|
Logistics→ Production→ Production Planning→ Demand Management→
Planned Independent Requirements→ Create
|
|
Transaction Code
|
MD61
|
|
SAP MENU
|
Logistics→ Production→ Production Planning→ Demand Management→
Planned Independent Requirements→ Change
|
|
Transaction Code
|
MD62
|
|
SAP MENU
|
Logistics→ Production→ Production Planning→ Demand Management→
Planned Independent Requirements→ Display
|
|
Transaction Code
|
MD63
|
So
far we have seen the master data. Now we shall see the transaction data. Planned
Independent Requirements (PIRs) are prime input for Production Planning. In
other words, they epitomize the function of their 5 days or 3 month or 1 year plan
to facilitate raw materials procurement and at the same time give flexibility
to change the production plan at any time, keeping in line with changing sales
situation.
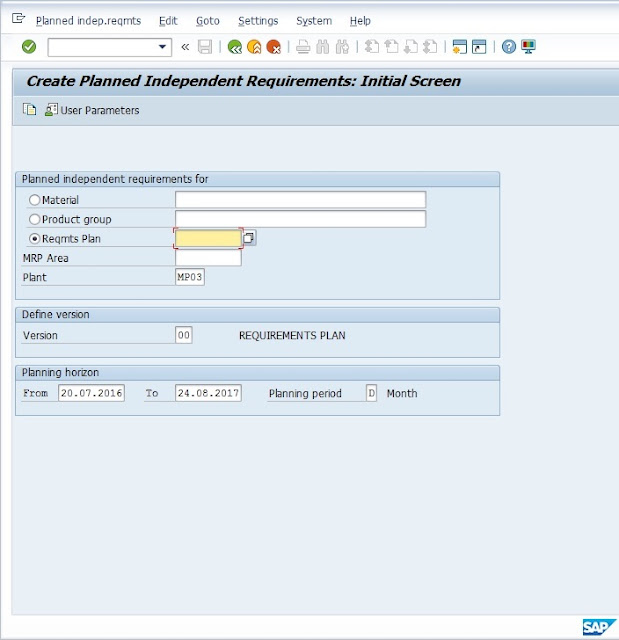
- Enter the desired Reqmts Plan, say, july19, and select his Plant say MP03
- Under Planning Horizon, say, enter From as 20.07.2016 and To as 24.07.2016.
- Under Planning period select D (Day Format).
- Now Press ENTER.
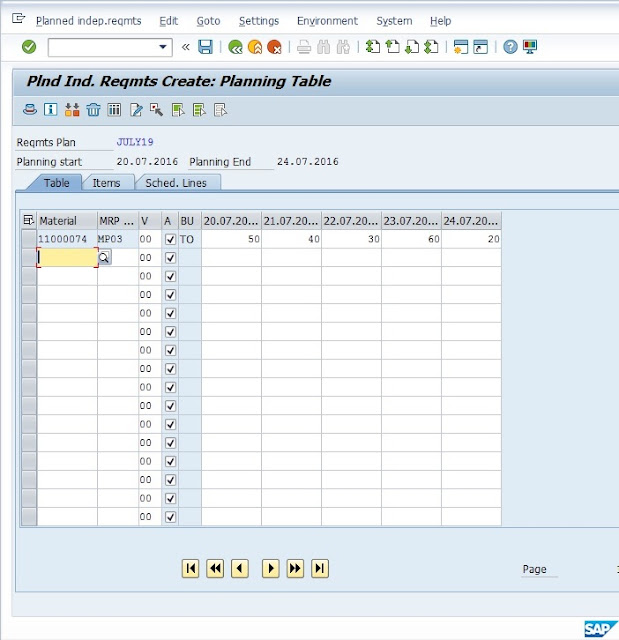
- Here, enter all the Materials in that Plant.
- Enter the Plant for all the Materials.
- For each Material, enter the daily requirements, say for the next 5 days.
- Now select the particular row for which you had entered the data.
- Click on the Sched. Lines tab.
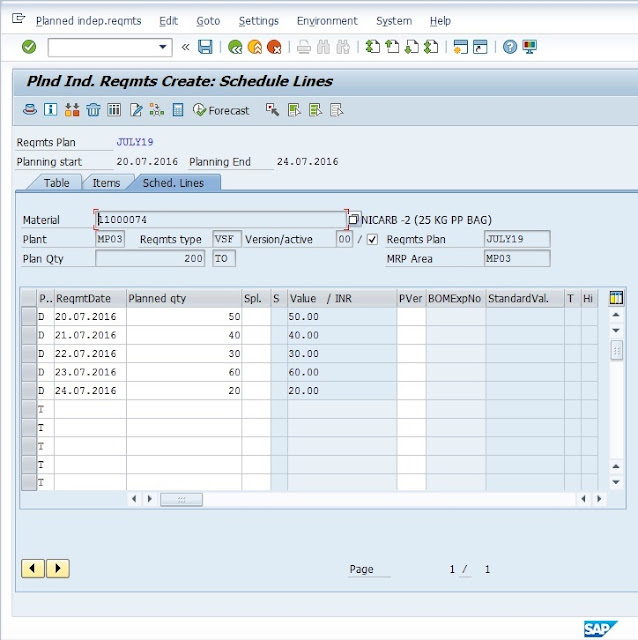
- Now go to settings and click on Production Version.
- You will see that PVer column is now editable.
- In that select the Production version which you had made previously.
- Now click on SAVE button and save the PIR which we generated.
MRP RUN PLANT SPECIFIC
|
SAP MENU
|
Logistics→ Production→ MRP→ Planning→ Total Planning→ Online
|
|
Transaction Code
|
MD01
|
MRP Run or Planning Run is an engine which
converts the requirements elements (Issues) into planned supply elements
(Receipts) and Balances the Demand/ Supply gap. Issues & Receipts
are called MRP Elements. Issues include PIRs, Dependent
Requirements, Order Reservations, Sales Orders, Issuing Stock Transfer Orders,
etc. Receipts include Planned (Production) Orders, Purchase
Requisitions, Purchase Orders, Open Production Orders, Receiving Stock Transfer
Order, Schedule lines, etc. Having said that, when we run MRP, Planned orders
are generated to offset the PIRs of Top level materials and Dependent
Requirements of lower level products. These Planned Orders can be converted to
actual Production Orders later and are executed then. Purchase Requisitions are
generated for Raw materials, which are converted to Purchase Orders to fulfill these
requirements.
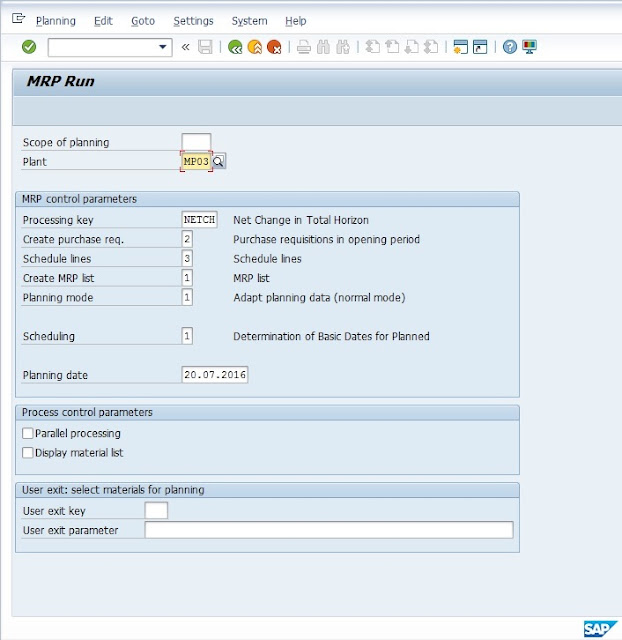
- Total Planning is used planning for all the materials in a plant in 1 transaction.
- Select Plant & press ENTER.
- You will see the log of all Material MRP has been run.
- It shows the number of materials planned. It also shows the no. of planned orders and purchase requisitions generated, etc.
MRP RUN MATERIAL SPECIFIC
|
SAP MENU
|
Logistics→ Production→ MRP→ Planning→ Multilevel Single-Item Planning
|
|
Transaction Code
|
MD02
|
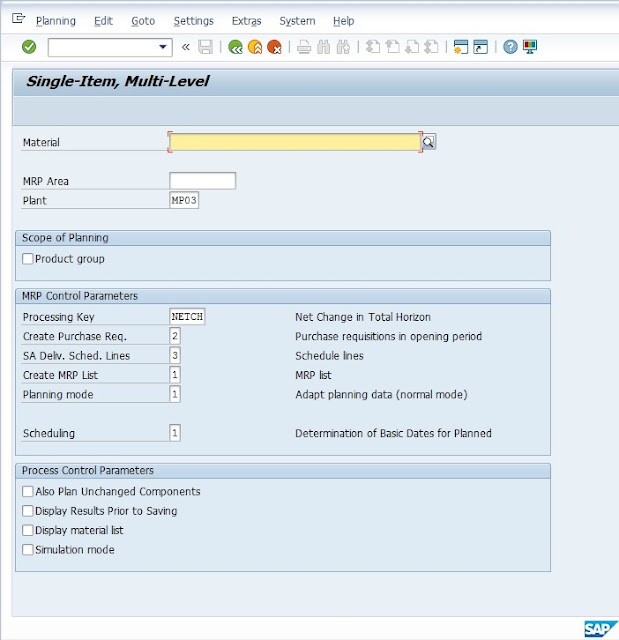
- Here, individual material is planned individually.
- Select Material, than Select Plant & press ENTER.
- You will see the log of Material MRP has been run.
- It shows the material planned. It also shows the no. of planned orders and purchase requisitions generated, etc. for that material.
MRP RUN SALES ORDER SPECIFIC
|
SAP MENU
|
Logistics→ Production→ MRP→
Planning→ Single-Item Planning, Sales
Oder
|
|
Transaction Code
|
MD50
|
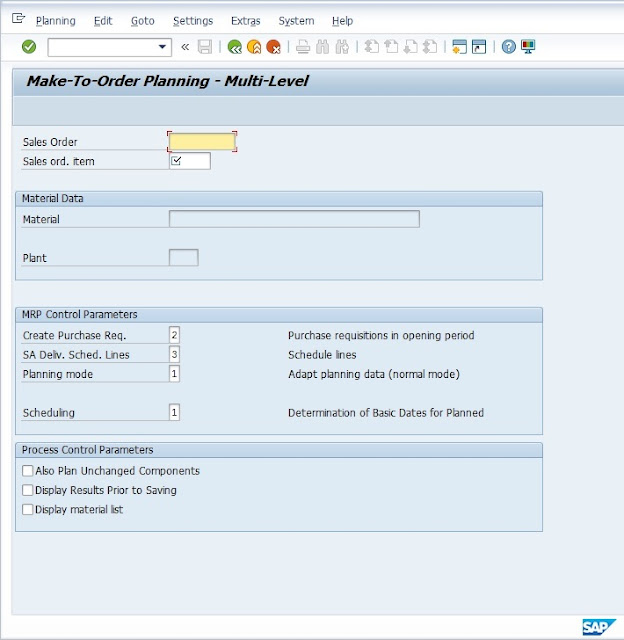
Here Specific Sales order is run directly by
entering the Sales Order no.
EVALUATION
|
SAP MENU
|
Logistics→ Production→ MRP→ Planning→
Evaluations→ Stock/Requirements List
|
|
Transaction Code
|
MD04
|
Stock/
Requirements list unlike MRP list is a dynamic report giving you up to date information
about new requirements of that material like PIRs, Issue Stock Transfer order, Sales
orders etc.
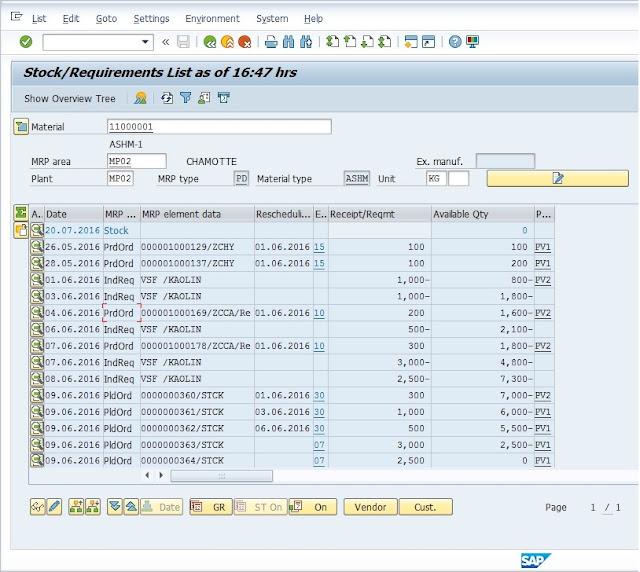
- In this window we can see the planned order, Production order, Independent Requirements, Available Qty., Requirement etc.
PRODUCTION ORDER CREATION MANUAL-MTS
|
SAP MENU
|
Logistics→ Production→ Shop Floor Control→ Order→ Create→ With Material
|
|
Transaction Code
|
CO01
|
|
SAP MENU
|
Logistics→ Production→ Shop Floor Control→ Order→ Change
|
|
Transaction Code
|
CO02
|
|
SAP MENU
|
Logistics→ Production→ Shop Floor Control→ Order→ Display
|
|
Transaction Code
|
CO03
|
This Function is used
to make production order without making plan order of any material.
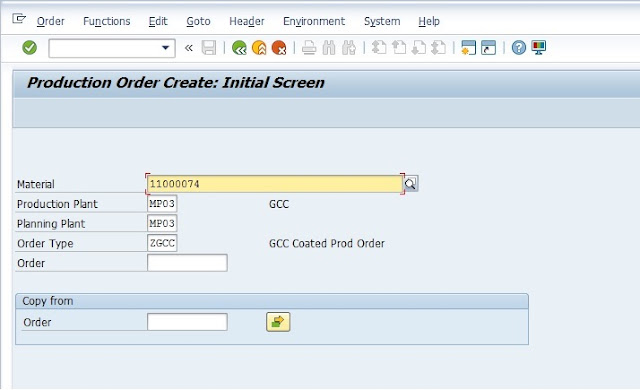
- For Material, select material from the drop down list which u want to create.
- For Production Plant, Select plant.
- For Planning Plant, Select plant.
- For Oder Type, Select type of plant (For example. GCC Coated Prod order).
- After that press ENTER. You will see the new window.
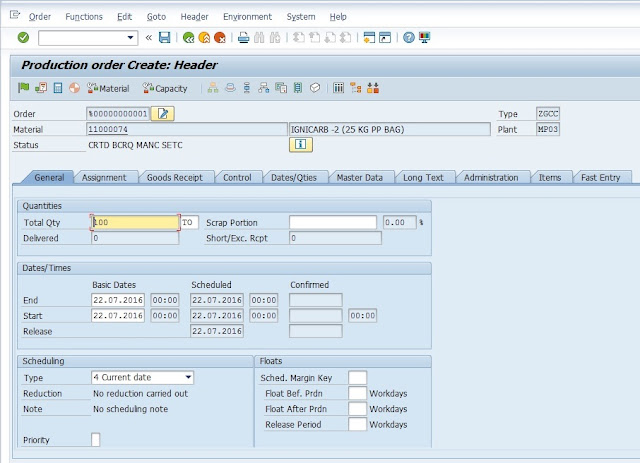
- Add value which we had decided in Total Qty.
- Select Current date in Type in Scheduling.
- Than press ENTER.
- If you have more than one production version. You will get new window in which select the production version for that
- Now click on Operation View. You will get new window open.
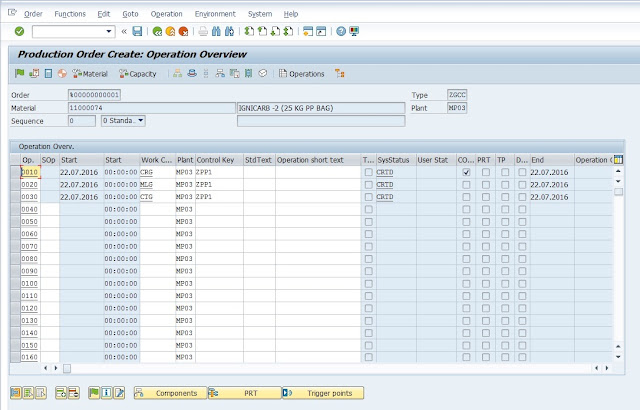
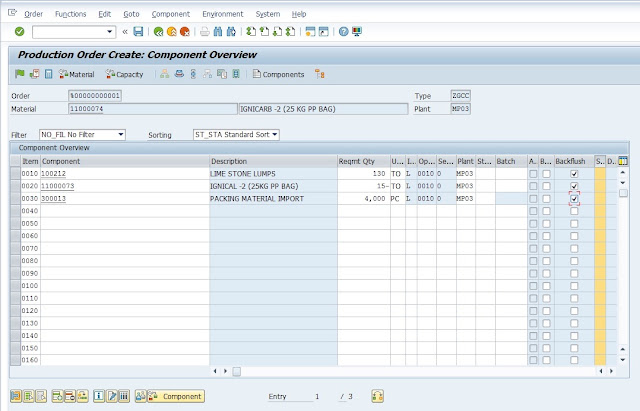
- Now click on BACK button to go back to main screen.
- Click on green flag button to release the order. It means it is ready to make the confirmation for that order and click on the SAVE button to save that order.
- After doing so you will see the order no. for that creation of Production order.
PRODUCTION ORDER CREATION BY CONVERTING PLANNED ORDERS-MTS
|
SAP MENU
|
Logistics→ Production→ MRP→ Planned Order→ Convert to Production Order→ Collective
Conversion
|
|
Transaction Code
|
CO41
|
|
SAP MENU
|
Logistics→ Production→ MRP→ Planned Order→ Convert to Production Order→ Partial
Conversion
|
|
Transaction Code
|
CO48
|
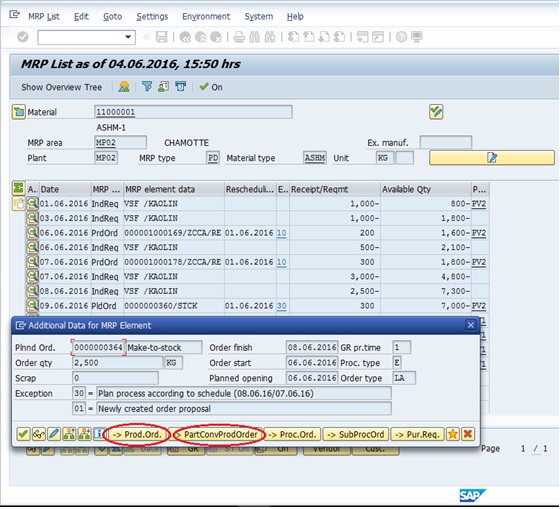
- Above image shows the evaluation method. In this click on magnifying lens button of planned order which we have to convert to production order.
- Now as shown in image you have two options for full its Prod. Ord. and for PartConvProdOrder for partial conversion.
- Click which you want. Follow the procedure of manual order creation.
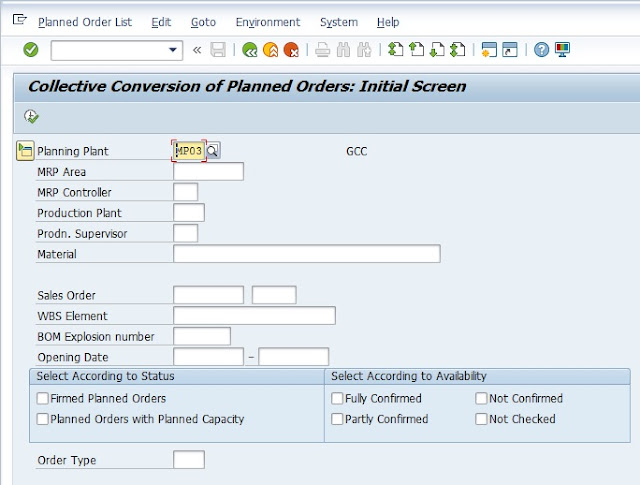
- In this Select Planning Plant and click on Clock button you will see list of planned order.
- Select order which you want to convert.
- Now follow the procedure of same thing which we had done in manual order creation.
Through C048 (Partial conversion)
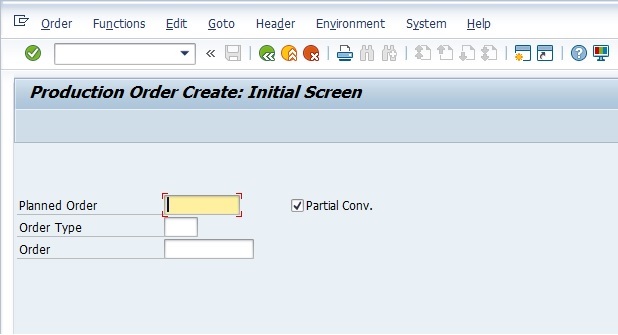
- In this Add Planned Order and Order Type.
- Press ENTER.
- Now follow the same procedure which we had done in manual order creation method.
PRODUCTION ORDER CREATION MANUAL-MTO
|
SAP MENU
|
Logistics→ Production→ Shop Floor Control→ Order→ Create→ For Sales Order
|
|
Transaction Code
|
CO08
|
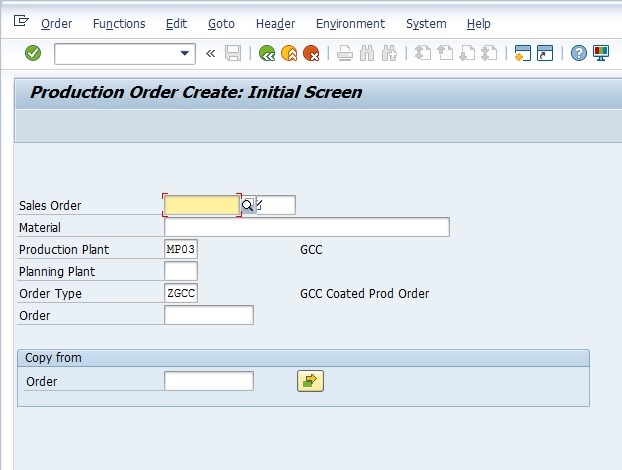
- This function is used to make production against the sales order.
- Select Sales Order or add the sales order no. given from the marketing team.
- Select Production Plant and Order Type.
- Press ENTER.
- You will get the same window open which we had done for manual production order creation (CO01).
- Follow the same thing Release the flag and Save it.
CONFIRMATION
|
SAP MENU
|
Logistics→ Production→ Shop Floor Control→ Confirmation→ Enter→ For Operation→ Time Ticket
|
|
Transaction Code
|
CO11N
|
|
SAP MENU
|
Logistics→ Production→ Shop Floor Control→ Confirmation→ Display
|
|
Transaction Code
|
CO14
|
- This function is used to confirm the production against the order which we had created.
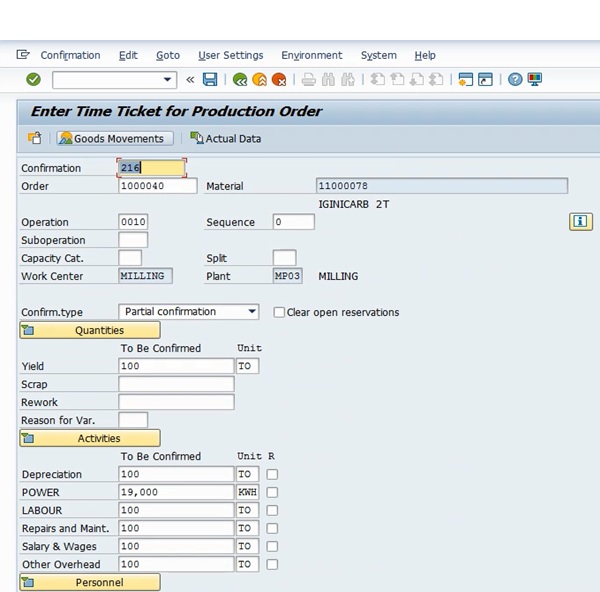
- Enter the order no. in Order tab & Press the ENTER button.
- If you have more than one work center in routing than it will ask to select the sequence.
- After selecting, add the tons to be confirmed in Yield.
- Select confirm. Type –partial if it is not the total quantity.
- Now in Activities for all add the same value which you had added in Yield But in POWER add the unit consumption for that particular Yield Value.
- Scroll down and at the end select the Shift. And if you want to add any description than you can add in blank box on upper side of shift selection box.
- Click on button goods movement button.
- You will see here the list of components and the FG which will be produce.
- Enter the storage location. Select the batch of raw material.
- Now select row of FG material. Go to Component – Batch Management – Create Batch.
- This function is used to add our identification code or we can say our own generated batch no. or lot no.
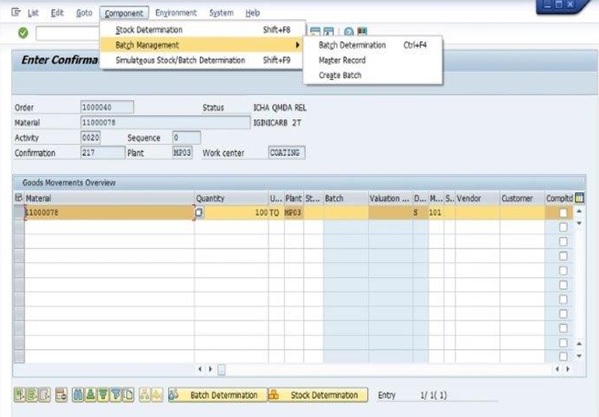
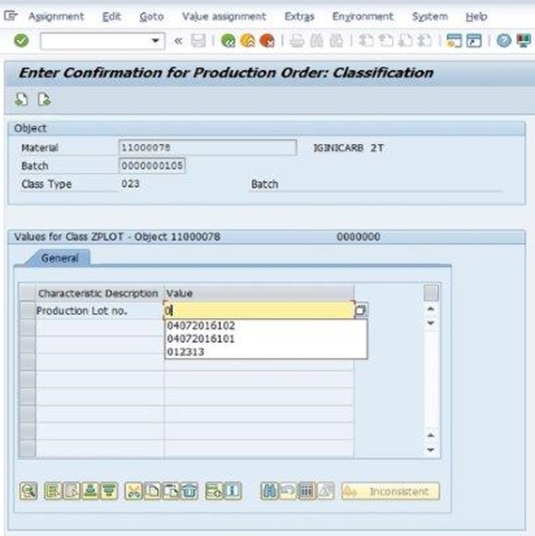
- After adding press enter and click BACK button to go back.
- Now click on SAVE button to save the confirmation.
CONFIRMATION CANCELLATION
SAP MENU
Logistics→ Production→ Shop Floor Control→ Confirmation→ Cancel
Transaction Code
CO13
- This function is used when we have to cancel the confirmation details in which incorrect information has been added during confirmation time.
- Add the confirmation no. or the order and press ENTER.
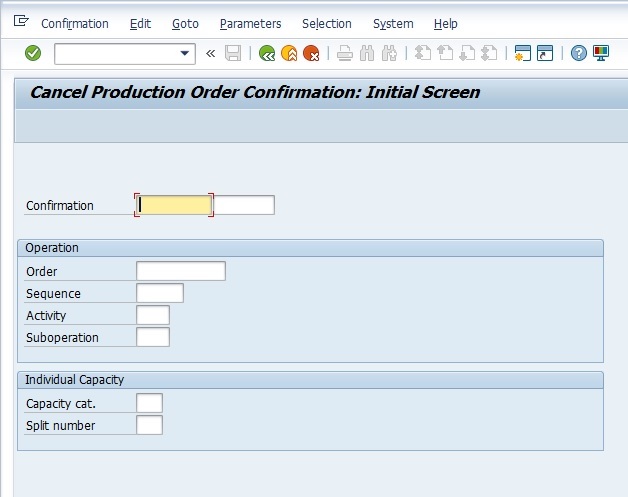
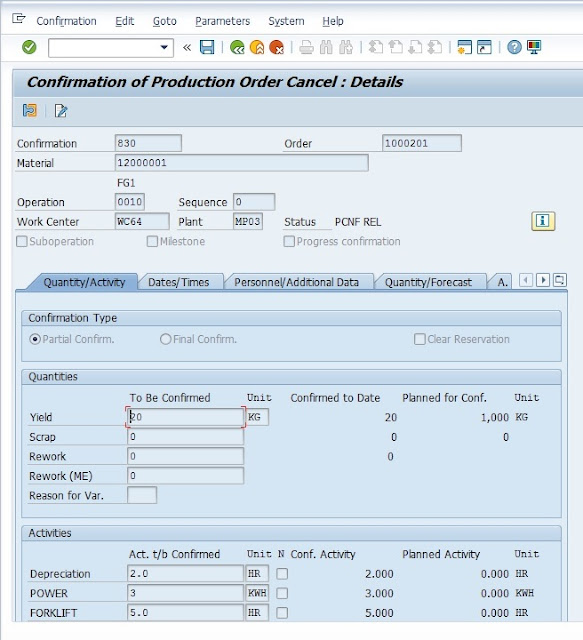
- In this select note icon and write down the reason.
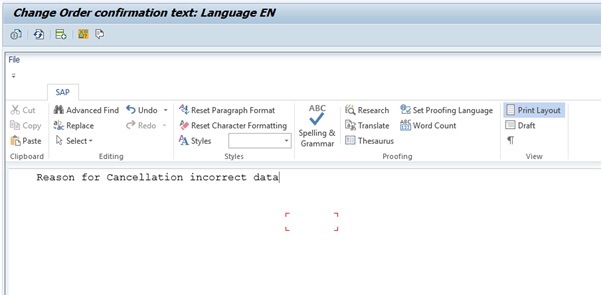
- Click on BACK button and click on SAVE button to save.
GOODS ISSUED-PLANNED
|
SAP MENU
|
Logistics→ Production→ Shop Floor Control→ Goods Movements→ Goods
Issue/ Goods Receipt
|
|
Transaction Code
|
MIGO
|
This function is
used to issue the raw material or to give the entry of by-product or for issue
of packing material.
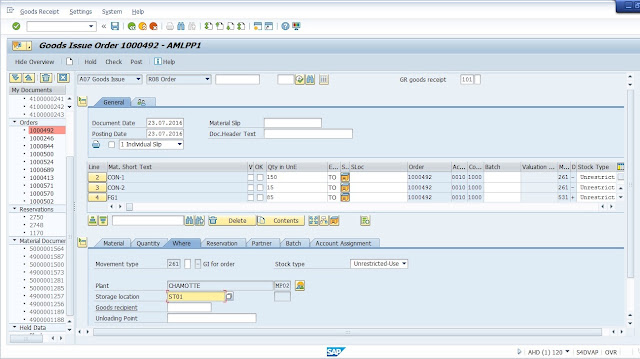
- Select GOODS ISSUE than select ORDER, add the order no. and press ENTER.
- Select the line for which you want to go further, now in Material tab, check the box of ITEM OK.
- In Quantity tab change the quantity if you want to. Next go to Where tab.
- In this you can see the Movement type. Different no. indicates different types of movement type. Select 261 for now (for by-product it will be 531)
- Select the storage location from the dropdown list. Enter the Batch in Batch tab.
- Now click on CHECK if it is okay then you will see DOCUMENT IS OK message. Click on to POST and click SAVE BUTTON to save.
GOODS ISSUED-UNPLANNED
|
SAP MENU
|
Logistics→ Production→ Shop Floor Control→ Goods Movements→ Goods
Issue/ Goods Receipt
|
|
Transaction Code
|
MIGO
|
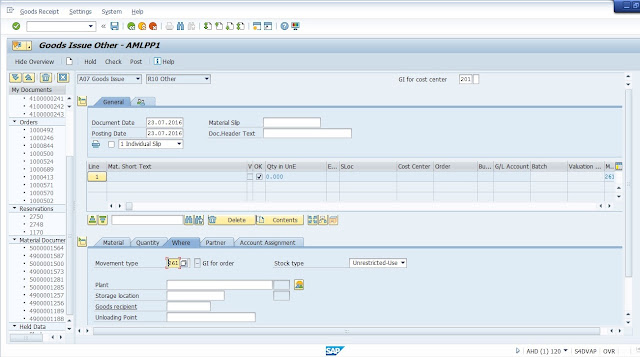
- This function is used to issue goods which are not planned. Example Furnace Oil.
- In Material Tab, select material which you want to issue.
- In Quantity Tab, add the qty.
- In Where Tab, Select Movement type select 261(against order) or 201(against cost center).
- Add Plant and storage location.
- If 261 selected the in account assignment select order no. & if 201 selected the select cost center.
- Check the box ITEM OK.
- Now click on CHECK if it is okay then you will see DOCUMENT IS OK message. Click on to POST and click SAVE button to save.
GOODS ISSUE REVESAL
|
SAP MENU
|
Logistics→ Production→ Shop Floor Control→ Goods Movements→ Goods
Issue/ Goods Receipt
|
|
Transaction Code
|
MIGO
|

- In Material Tab, select material which you want to issue.
- In Quantity Tab, add the qty.
- In Where Tab, Select Movement type select 262(against order) or 201(against cost center).
- Add Plant and storage location.
- If 262 selected the in account assignment select order no. & if 202 selected the select cost center.
- Check the box ITEM OK.
- Now click on CHECK if it is okay then you will see DOCUMENT IS OK message. Click on to POST and click SAVE button to save.
GOODS RECEIPT
|
SAP MENU
|
Logistics→ Production→ Shop Floor Control→ Goods Movements→ Goods
Issue/ Goods Receipt
|
|
Transaction Code
|
MIGO
|
- This function is used for posting the Finish good manually, when we had not used the auto GR function (ZPP6).
- Select GOODS RECEIPT than ORDER select, add the order no. and press ENTER.
- Select the line for which you want to go further, now in Material tab, check the box of ITEM OK
- In Quantity tab change the quantity if you want to. Next go to Where tab.
- In this you can see the Movement type. Different no. indicates different types of movement type. Select 101 for now.
- Select the storage location from the dropdown list. Enter the Batch in Batch tab.
- Now click on CHECK if it is okay then you will see message DOCUMENT IS OK. Click on to POST and click to SAVE button.
GOODS RECEIPT REVERSAL
SAP MENU
|
Logistics→ Production→ Shop Floor Control→ Goods Movements→ Goods Issue/ Goods Receipt
|
Transaction Code
|
MIGO
|
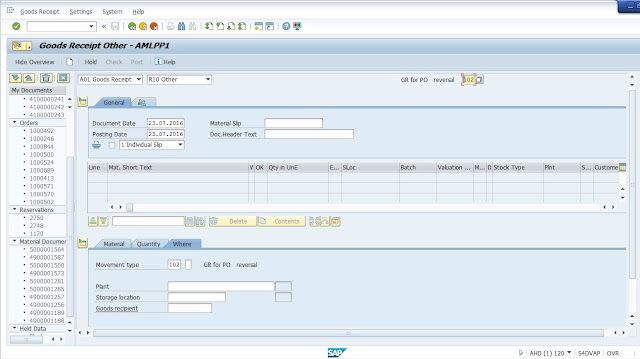
- In Material Tab, select material which you want to issue.
- In Quantity Tab, add the qty.
- In Where Tab, Select Movement type select 102.
- Add Plant and storage location.
- Check the box ITEM OK.
- Now click on CHECK if it is okay then you will see message DOCUMENT IS OK. Click on to POST and click SAVE button to save.
TECHNICAL COMPLETION OF ORDER
If we don’t want
to process further with the production order which we had created and want to
close it. (For example we made production order of 500MT. We made 400MT and
don’t want to proceed further). At this time technical completion of order
process is used.
- Go to CO02 (change mode of production order creation).
- Enter the production order no.
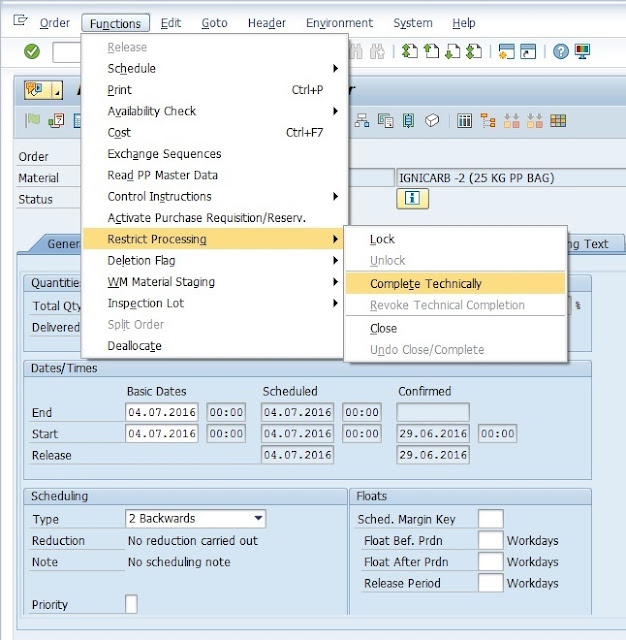
- Go to functions – Restrict Processing – Complete Technically.
- You see the difference in status REL to TECO.
REWORK / REPROCESS
SAP MENU
Logistics→ Production→ Shop Floor Control→ Order→ Create→ Without Material
Transaction Code
CO07
- This function is used when we want to do repacking, reprocess or rework.
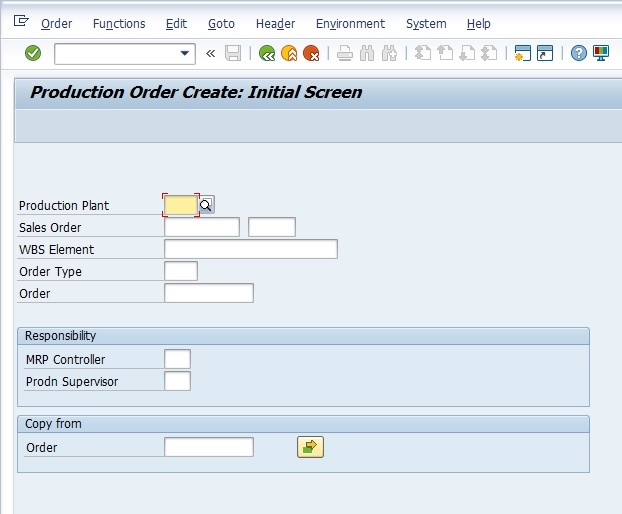
- Select Production Plant & Order type as reprocess and Press ENTER.
- You will get the same screen as we get in manual order creation.
- Add the Description for that process & Add Total Qty. as 1 and Press ENTER.
- Scheduling Type select Current date.
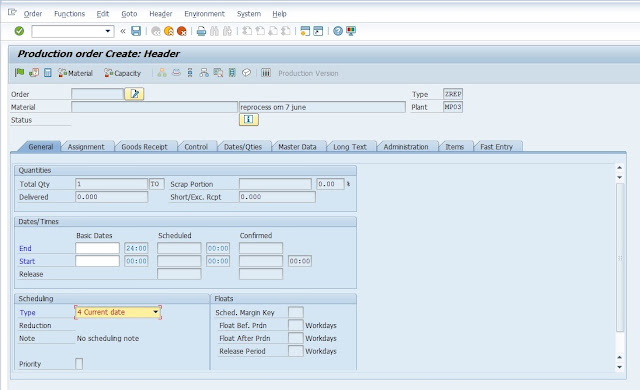
- After entering all this data, Press ENTER. (You will get below message).
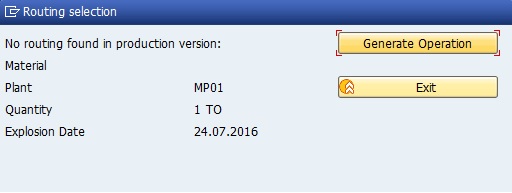
- Press Generate Operation.
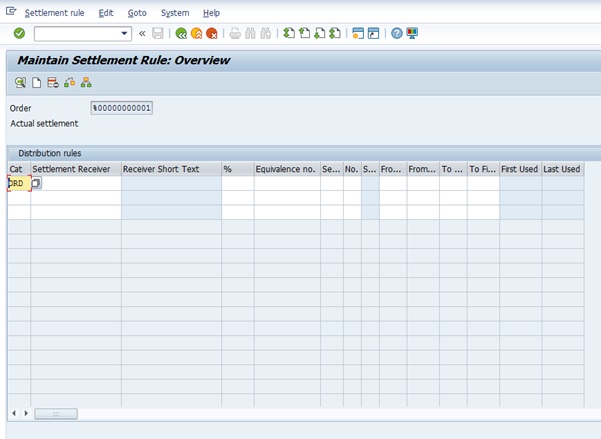
- After that you’ll get below screen and in that screen select ORD from dropdown list for Cat.
- In Settlement Receiver add the Production Order no.
- It means you are generating this process against production order.
- Now Press BACK button to go back. And go to COMPONENT OVERVIEW button.
- Add the Components ( For example for repacking from jumbo to 25kg bag FG in jumbo Qty, 25kg bags Qty, FG in 25 kg –ve Qty)
- Now again go back and select OPERATION OVERVIEW button in this add the work center as repacking.
- Click on the GREEN FLAG button to release the order. It means it is ready to make the confirmation for that order and click on the SAVE button to save that order.
- Now do the CONFIRMATION (CO11N) for this order generated.
- But Add 1 TO in Yield Qty.
- And in Activities add TO which you had add in Component overview.
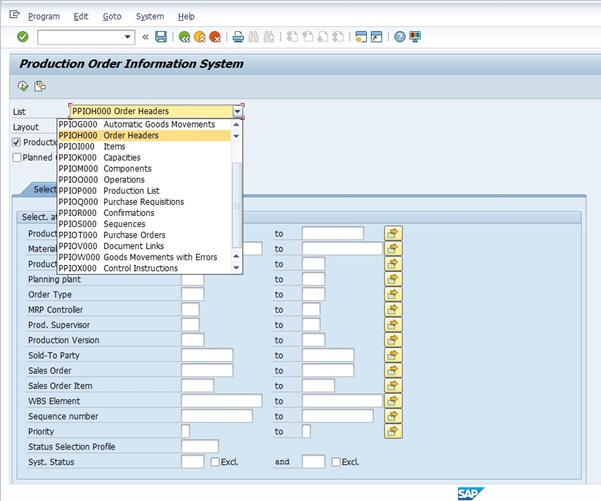
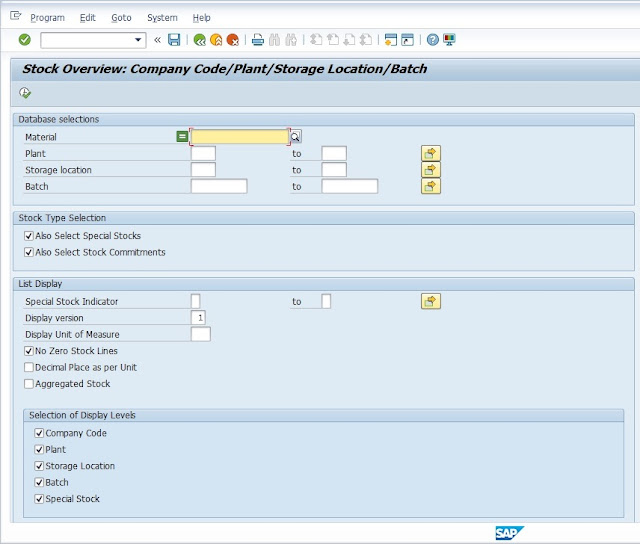
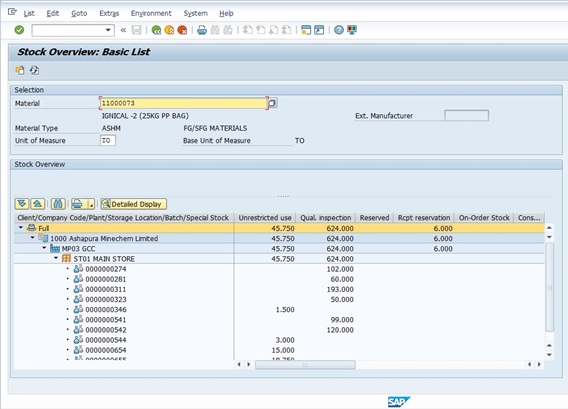
REPORTS
|
SAP MENU
|
Logistics→ Production→ Shop Floor Control→ Information System→ Order Information System
|
|
Transaction Code
|
COOIS
|
|
SAP MENU
|
Logistics→ Production→ Shop Floor Control→ Information System→ Stock
overview
|
|
Transaction Code
|
MMBE
|
Through COOIS, we get all information
related to production order, just add plant.
Through MMBE, we can get stock overview of particular material or all
material in a plant.
CREATED BY DHAIRYAJEET PARMAR-
No comments:
Post a Comment